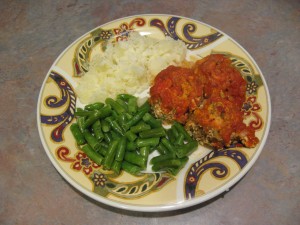
No, I have not suddenly gone crazy and decided that road kill is vegetarian … this is just the name I’ve always known this dish by. I think the original idea is that the rice pokes out of the ball shape a little bit when they cook, so they look a bit like little scared porcupines. I’ve never really seen it myself (who ever saw a red porcupine, anyway? Even Sonic was blue…and supposed to be a hedgehog!), but the name certainly catches the attention. Also, I can’t think of anything better that doesn’t make them sound gross, which they aren’t.
Now that that is cleared up, I do assure you that these are better than they might sound :-). The spices give them a lot more flavor than it seems, and they’re quite juicy. My mother, who grew up eating meat, says that they fill the same sort of dinner type slot that meat loaf would fill for a meat eater. Now, I’ve always thought meat loaf looked a) bland b) yucky and c) lame. Porcupines are none of these things, but I suspect she is referring to the texture combined with the fact that they have tomato all over them (don’t many people put ketchup on meatloaf?). Anyway, these are very filling and have lots of protein in them and are best served with either mashed or baked potatoes. I also like to put steamed green beans on the side, to round out the meal, but if you don’t like green beans pretty much any nice green veggie will work.
Porcupines
- 1 lb tofu, firm or extra firm (firm silken will work, but it’ll bake a little differently)
- ½ cup raw brown rice (short or long grain, as you prefer)
- 1 egg
- 2 tbs oil
- 1 small onion, finely chopped (about 1/2 to 3/4 of a cup)
- 1 tsp thyme
- 2 tbs soy sauce
- 10 grinds fresh pepper (appx. 1/8 tsp preground)
- 2 tbs dried parsley
- 2 cups tomato juice (or a can, which is more like 1.5 or 1.75 cups, plus some water)
Directions:
1. Preheat the oven to 450 degrees Fahrenheit. Grease an 8×8 pan and set aside.
2. Drain the tofu and crumble it into a medium mixing bowl using your fingers. Add all the remaining ingredients except the tomato juice and mix them all together well. You can mix it a little with your hands (like making meatloaf–another parallel there, I guess) or just do a really good job with a spoon.
3. Form the mixture into little balls, somewhere around the size of a very large golf ball or a very small racket ball. To do this I take an ice cream scoop and pack the mixture in until it’s firmly pressed in there. Yes, these are half balls, technically, but since you want them to sit on a flat surface this works very well (trying to do it freehand is REALLY ANNOYING and I recommend finding a mold of some kind, even if you don’t own an ice cream scoop…though you should just get one, since they’re handy for things other than scooping ice cream, like this :D). Put the balls into the greased pan in a single layer. DO NOT STACK, but they can be touching, that’s fine (the more exactly they fill the pan the less tomato juice you’ll need to cover them).
4. Put the dish into the preheated oven and bake for about 15 minutes, until the balls are lightly browned. Remove the pan from the oven at the end of this time.
5. Pour the tomato juice over the balls, adding a little extra juice or some water to make sure the balls are pretty much covered (if they aren’t the part that is sticking out the whole cooking time will have raw crunchy rice in it). Cover the pan with foil.
6. Turn the oven down to 325 degrees Fahrenheit and immediately return the covered pan to the oven. Bake for about 1 hour or a little more, until the rice is done. Remove from oven and let sit a few minutes before serving.
Serving Notes: I just use a slotted spoon to serve so that you don’t get juice all over the plate as much, but you can try and drain some of the liquid out if you want (it’ll be a bit messy and you’ll have to be very careful). One way or the other you do need to let them sit long enough that the juice stops boiling before you try and serve them :-). The juice is actually rather tasty, and some of the people I’ve eaten this with actually prefer to have it and put it on their potatoes (sometimes they even just put the porcupine on top of their potato). Enjoy your meal!


Leave a Reply