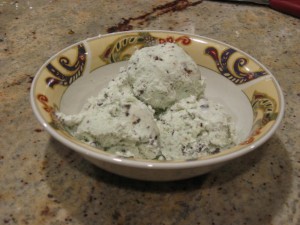
I’m back! We had a good, if very long, vacation. Thank you to Jennifer for covering for me so that I didn’t have to try and post from the wilds of Crater Lake and Yosemite National Parks :D. As we rarely had cell reception, let alone an internet connection, it could have gotten interesting! Would you have read recipes in smoke signals? I’m not sure that’s our best medium … well, I’m back online now, so it’s all a moot point.
I actually started working on this recipe before we left, but couldn’t do the final test in time to post it before vacation. Nonetheless, it is still summer, and thus still ice cream season, so we’re still good to go. The quality of the chocolate matters, and I recommend looking for a natural-sugar sweetened variety, but Hershey’s Sugar-Free Dark will work in a pinch. Be aware that nearly all sugar-free chocolates, regardless of sweetener type, will not act exactly as the sugared kind in cooking or baking. In this case, freezing them means that you get a slightly grainier texture than you would with sugared chocolate–the other sweeteners tend to be more brittle than sugar, especially when cold. It still tastes darn good, in the collective opinion of this household, and some folks wouldn’t notice it, but we’re a bit picky. Some sacrifices have to be made, though, and the texture difference isn’t too noticeable with good-quality chocolate. Cheap or just plain badly made stuff (you’d be surprised how many “fancy brands” just can’t do sugar-free worth a dang) will be very waxy and stick in your mouth quite unplesantly, so buyer beware. There isn’t much way to find out which brands are which without just trying the ones available near you. We’re still working our way through the options, here, but I’ll be sure to post an update letting you know our final opinions once we’ve tried a few more brands!
Mint Chocolate Chip Ice Cream
Ingredients:
- 1 cup 2% milk
- 2 cups heavy cream
- 3/4 tsp vanilla
- 2 tsp peppermint extract
- 3 TBS Truvia
- *4 drops (or more, if you like) green food coloring
- 4 oz sugar-free dark chocolate, chopped finely
*optional ingredient
Directions:
1. In a small saucepan, combined the milk, cream, and Truvia. Bring to just barely bubbling around the edges but hot through (this is called “scalding the milk”, if you’re curious) and stir well, making sure all the Truvia is dissolved and the milk and cream are well combined. Set this aside, off the heat.
2. Once the milk mixture is cooled to room temperature, add the vanilla, peppermint extract and food coloring. It is important that the mixture be cooled because the extracts are in an alcohol suspension and will boil off in ways that effect the final flavor if they are added when the milk is hot. Mix well.
3. Chill this ice cream base in the refridgerator until chilled through. This usually takes a couple of hours. You don’t want to put a room temperature mixture into your ice cream maker–it won’t chill down as well and it may form yucky ice crystals as it mixes.
4. Once cool, put the mixture in the ice cream maker, following all the usual manufacturer’s directions for your model. You can make ice cream without this, but I don’t recommend it in this case.
5. Keep half an eye on your chilling ice cream. When it is the consistency of a thick milkshake, add the finely chopped chocolate while the mixer is still going (if at all possible. If not, add it quickly, pop the lid back on and let it get back to churning ASAP). Let the mixer paddle combine the chocolate bits and the ice cream for you.
6. Once the mixer has done all it can, quickly move the ice cream to a chilled bowl and put it in the freezer to harden off (preferably covered, since that reduces messes and the likelihood of something contaminating your ice cream). Once it is hard enough, serve up and enjoy!


Leave a Reply