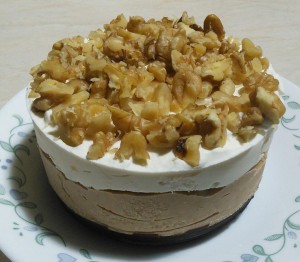
It may not look like much, but a little goes a long way. 🙂 A cherry chocolate bottom “crust,” a tangy creamy filling, and sugar-free whipped cream and walnuts on top. Sure, it’s not technically shaped like a pie, but good enough, right? A quarter of this little treat is more than enough for one serving!
To make this pie, you’ll need black cherry juice concentrate (mine is reduced to a syrup that takes five parts water to reconstitute) , a 3″ springform pan, an immersion blender, and patience. Each layer has to freeze before you add the next; then you need to freeze the whole thing before taking it out of the springform and slicing it up. It’s a good idea to start early in the day if you want this ready after dinner time. You could probably use other concentrates to flavor and sweeten the pie if you wanted — raspberry sounds good to me, and you might even make orange work — but make sure it’s sweet and as syrupy as possible. This pie is more rich than sweet, so you risk making something that’s surprisingly hard to eat if you leave out any of the sweetening ingredients.
But in any case — pie. 🙂
Mini Icebox Pie
Yield: 4 servings
Ingredients:
for the “crust”:
- 2 T + 2 tsp palm shortening
- 1/2 tsp vanilla extract
- 1/16 tsp liquid stevia extract
- 2 T cocoa powder
- 2 tsp carob powder
- 1/2 tsp black cherry concentrate
for the filling:
- 6 T creamy peanut butter (sugar-free! — I recommend Teddie’s), or cashew butter
- 1/2 cup plain Greek yogurt
- 3/4 tsp vanilla extract
- 1/8 tsp liquid stevia extract
- 1 tsp black cherry concentrate
for the topping:
- 2/3 cup whipped cream
- 1/4 cup chopped walnuts
Directions:
1. In a small saucepan over very low heat, melt the palm shortening, then whisk in the remaining “crust” ingredients (vanilla, stevia, cocoa powder, carob powder, and black cherry concentrate) until fully combined. Pour the resulting liquid into the bottom of the springform, then carefully place it in the freezer to set.
2. While the chocolate sets, combine the filling ingredients (Greek yogurt, peanut butter, vanilla, stevia, and black cherry concentrate) in a medium-to-large mixing bowl, and blend with an immersion blender until fully combined. (You can use a regular blender, or a small work bowl in a food processor, but it’s actually more of a pain than you’d expect with the peanut butter. The immersion blender makes it quick and easy since you can “stir” with it.)
3. The chocolate should set fairly quickly — ten minutes at the very most, if your freezer isn’t very cold. Spoon the filling over the frozen chocolate, then even out the top with a floppy spatula; return the springform to the freezer for an hour or two to set.
4. Finally, top the hardened filling with whipped cream and nuts. (The 2/3 cup whipped cream should be the right amount to fill the springform all the way to the top.) Freeze one more time until the whipped cream is hardened and stiff.
5. Once the whole pie is frozen and set, gently unlatch the springform. If necessary use the flat of a butter knife to separate the bottom piece of the pan from the pie. Place the pie on a cutting board and cut it into quarters with a long serrated knife, then store the slices in the freezer in tupperware. Serve at any time.


Leave a Reply